react-redux的学习实现第二课:使用高阶组件包裹纯函数的方式提高组件复用性
上一节的代码中展示了如何将react和redux结合起来,但是我们每一次都需要组件从context中取到store,然后再进行状态的更新。这样看来,每一次使用的时候我们都需要去获取,并也需要提前去在使用store的一系列子组件的父级组件上设置context,这样紧密的耦合,直接导致了我们组件的复用性降为零。所以这一节中react小书展示了如何去解耦合并实践一下高级组件的使用。
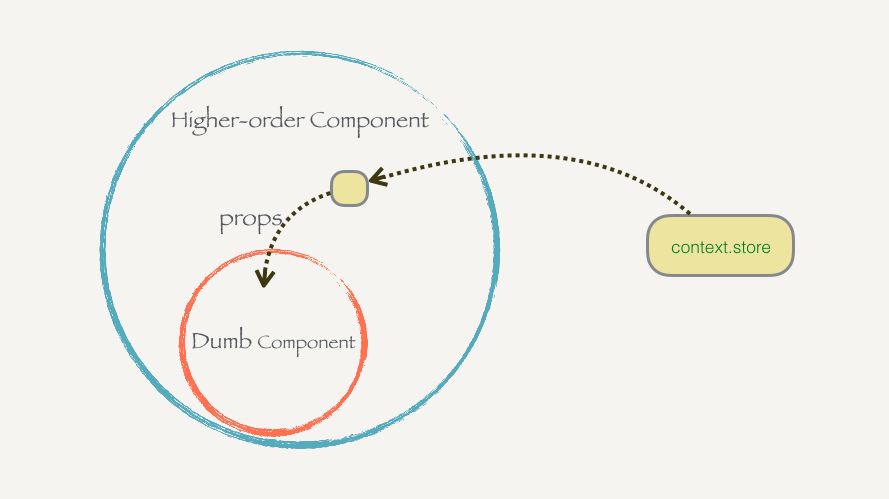
如上图所示,我们所要做的就是将context的绑定放在高阶组件中,通过高阶组件包裹父组件,然后父组件向下传递props来控制一堆dumb组件即可。 这个高阶组件命名为connect,显然它的功能就是用来连接context以及我们的dumb组件。
import React, { Component } from 'react'
import PropTypes from 'prop-types'

export connect = (WrappedComponent) => {
  class Connect extends Component {
    static contextTypes = {
      store: PropTypes.object
    }

    // TODO: 如何从 store 取数据?

    render () {
      return <WrappedComponent />
    }
  }

  return Connect
}
一点思考:
第一点:我们在编写这个高阶组件的时候,要怎么把这个store传进去?
第二点:我们使用高阶组件去包裹的dumb组件他们需要的内容不都是一样的,比如Header组件只需要一个主题色themeColor即可,但是ThemeSwitch除了主题色之外,还需要传入一个切换颜色的控制函数,这样一来我们要如何去区分传入的store的内容?
解决思路,如作者所说,我们可以将下面这样的函数当做参数传给connect函数:
const mapStateToProps = (state) => {
  return {
    themeColor: state.themeColor,
    themeName: state.themeName,
    fullName: `${state.firstName} ${state.lastName}`
    ...
  }
}
然后在connect函数的内部的context里面通过store.getState传值给mapStateToProps,返回一个dumb组件需要的全部内容的对象,然后将该对象传给高阶组件包裹的组件,具体实现如下:
import React, { Component } from 'react';
import PropTypes from 'prop-types';

export const connect = (mapStateToProps) => (WrappedComponent) => (
  class extends Component {
    constructor(props) {
      super(props);

    }

    static contextTypes = {
      store: PropTypes.object
    };

    render() {
      const { store } = this.context;
      const stateProps = mapStateToProps(store.getState());
      return <WrappedComponent {...stateProps}/>
    }
  }
);
具体的使用方法如下:
//如果是Header组件,他仅需要themeColor
const mapStateToProps = (state) => {
  return {
    themeColor: state.themeColor
  }
}
Header = connect(mapStateToProps)(Header)

//如果是ThemeSwitch,他需要themeColor以及switchColor函数
const mapStateToProps = (state) => {
  return {
    themeColor: state.themeColor,//propTypes限制为字符串类型
	switchColor: state.switchColor,//propTypes限制为函数类型
  }
}
ThemeSwitch = connect(mapStateToProps)(ThemeSwitch)
此时完整的代码如下:
Header组件(保留了原来的部分,注释后做对比)
import React, { Component } from 'react';
import PropTypes from 'prop-types';
import { connect } from './react-redux';

class Header extends Component {
  constructor(props) {
    super(props);
    this.state = {
      themeColor: ''
    };
  }

  static propTypes = {
    // store: PropTypes.object
    themeColor: PropTypes.string
  };

  // componentWillMount() {
  //   const { store } = this.context;
  //   this._updateThemeColor();
  //   store.subscribe(this._updateThemeColor);
  // }

  // _updateThemeColor = () => {
  //   const { store } = this.context;
  //   const state = store.getState();
  //
  //   this.setState({
  //     themeColor: state.themeColor
  //   });
  // };

  render() {
    return (
      <h1 style=>我是Title</h1>
    )
  }
}

const mapStateToProps = (state) => {
  return {
    themeColor: state.themeColor
  }
};
Header = connect(mapStateToProps)(Header);
export default Header;
Content组件
import React, { Component } from 'react';
import ThemeSwitch from './ThemeSwitch';
import PropTypes from "prop-types";
import { connect } from './react-redux';

class Content extends Component {
  constructor(props) {
    super(props);
    // this.state = {
    //   themeColor: ''
    // };
  }

  static propTypes = {
    // store: PropTypes.object
    themeColor: PropTypes.string
  };

  // componentWillMount() {
  //   const { store } = this.context;
  //   this._updateThemeColor();
  //   store.subscribe(this._updateThemeColor);
  // }
  //
  // _updateThemeColor = () => {
  //   const { store } = this.context;
  //   const state = store.getState();
  //
  //   this.setState({
  //     themeColor: state.themeColor
  //   });
  // };

  render() {
    return (
      <div>
        <p style=>我是Content</p>
        <ThemeSwitch />
      </div>
    )
  }
}
const mapStateToProps = (state) => {
  return {
    themeColor: state.themeColor
  }
};
Content = connect(mapStateToProps)(Content);
export default Content;
但是此时刷新页面之后,点击按钮,只有按钮会变色,标题和内容不变,这是因为我们在改造时并没有考虑到还有dispatch函数去触发订阅函数,现在开始修改这一部分。 首先,回想一下,之前触发dispatch时的订阅是怎么写的。
//旧代码
componentWillMount() {
    const { store } = this.context;
    this._updateThemeColor();
    store.subscribe(this._updateThemeColor);
  }

  _updateThemeColor = () => {
    const { store } = this.context;
    const state = store.getState();

    this.setState({
      themeColor: state.themeColor
    });
  };
每一个组件都是在componentWillMount阶段往事件队列里面推入订阅事件,该订阅事件为更新当前组件的state,那我们就可以把这一部分转移到高阶组件中,让高阶组件帮我们做完这一部分工作。
此时,react-redux文件的代码如下:
import React, { Component } from 'react';
import PropTypes from 'prop-types';

export const connect = (mapStateToProps) => (WrappedComponent) => (
  class extends Component {
    static contextTypes = {
      store: PropTypes.object
    };

    constructor () {
      super()
      this.state = { allProps: {} }
    }

    componentWillMount () {
      const { store } = this.context;
      this._updateProps();
      store.subscribe(() => this._updateProps());
    }

    _updateProps () {
      const { store } = this.context;
      console.log('this.props', this.props);
      let stateProps = mapStateToProps(store.getState(), this.props); // 额外传入 props,让获取数据更加灵活方便
      this.setState({
        allProps: { // 整合普通的 props 和从 state 生成的 props
          ...stateProps,
          ...this.props
        }
      }, () => {
        console.log('this.state.allProps', this.state.allProps);
      });

    }

    render() {
      return <WrappedComponent {...this.state.allProps}/>
    }
  }
);
我们做了以下修改:
- 将mapStateToProps的参数改为了两个,前一个为state,后一个留给之后可能传入的高阶组件的props。
- 在高阶组件中componentWillMount阶段去初始化更新state,然后将更新的内容,传给包裹组件,并将更新state的函数加入事件队列中。
初始化:

点击Blue按钮:

可以在控制台看到我们更新后的最新state以及传递给包裹组件的stateProps内容。
本节重点需要理解的内容:
- 将mapStateToProps修改两个参数之后,要理解后一个参数this.props的含义
- 时刻记得在组件加载的时候去初始化state之后要将订阅的事件推入队列,否则之后一系列的dispatch触发是不能够引起页面变更的